Introduction
Creating lessons is the final preparatory step before generating your timetable. Lessons connect teachers, classes, and subjects together to form the building blocks of your schedule. This critical step determines who teaches what to whom and how frequently.
Before starting this step, make sure you have:
- Completed the general information setup
- Added all your school subjects
- Set up all classes and sections
- Added all teachers and their subject specializations
- Determined the teaching requirements for all classes
Understanding Lessons
In TimetableMaster, a lesson represents a specific teaching arrangement:
- A teacher or multiple teachers teaching a subject or multiple subjects to a class or multiple classes for a specific number of periods per week/cycle
For example:
- Ms. Johnson (teacher) teaching Mathematics (subject) to Grade 8A (class) for 5 periods per week
- Mr. Chen (teacher) teaching Physics (subject) to Grade 10 and Grade 11 Science together (class) for 4 periods per week

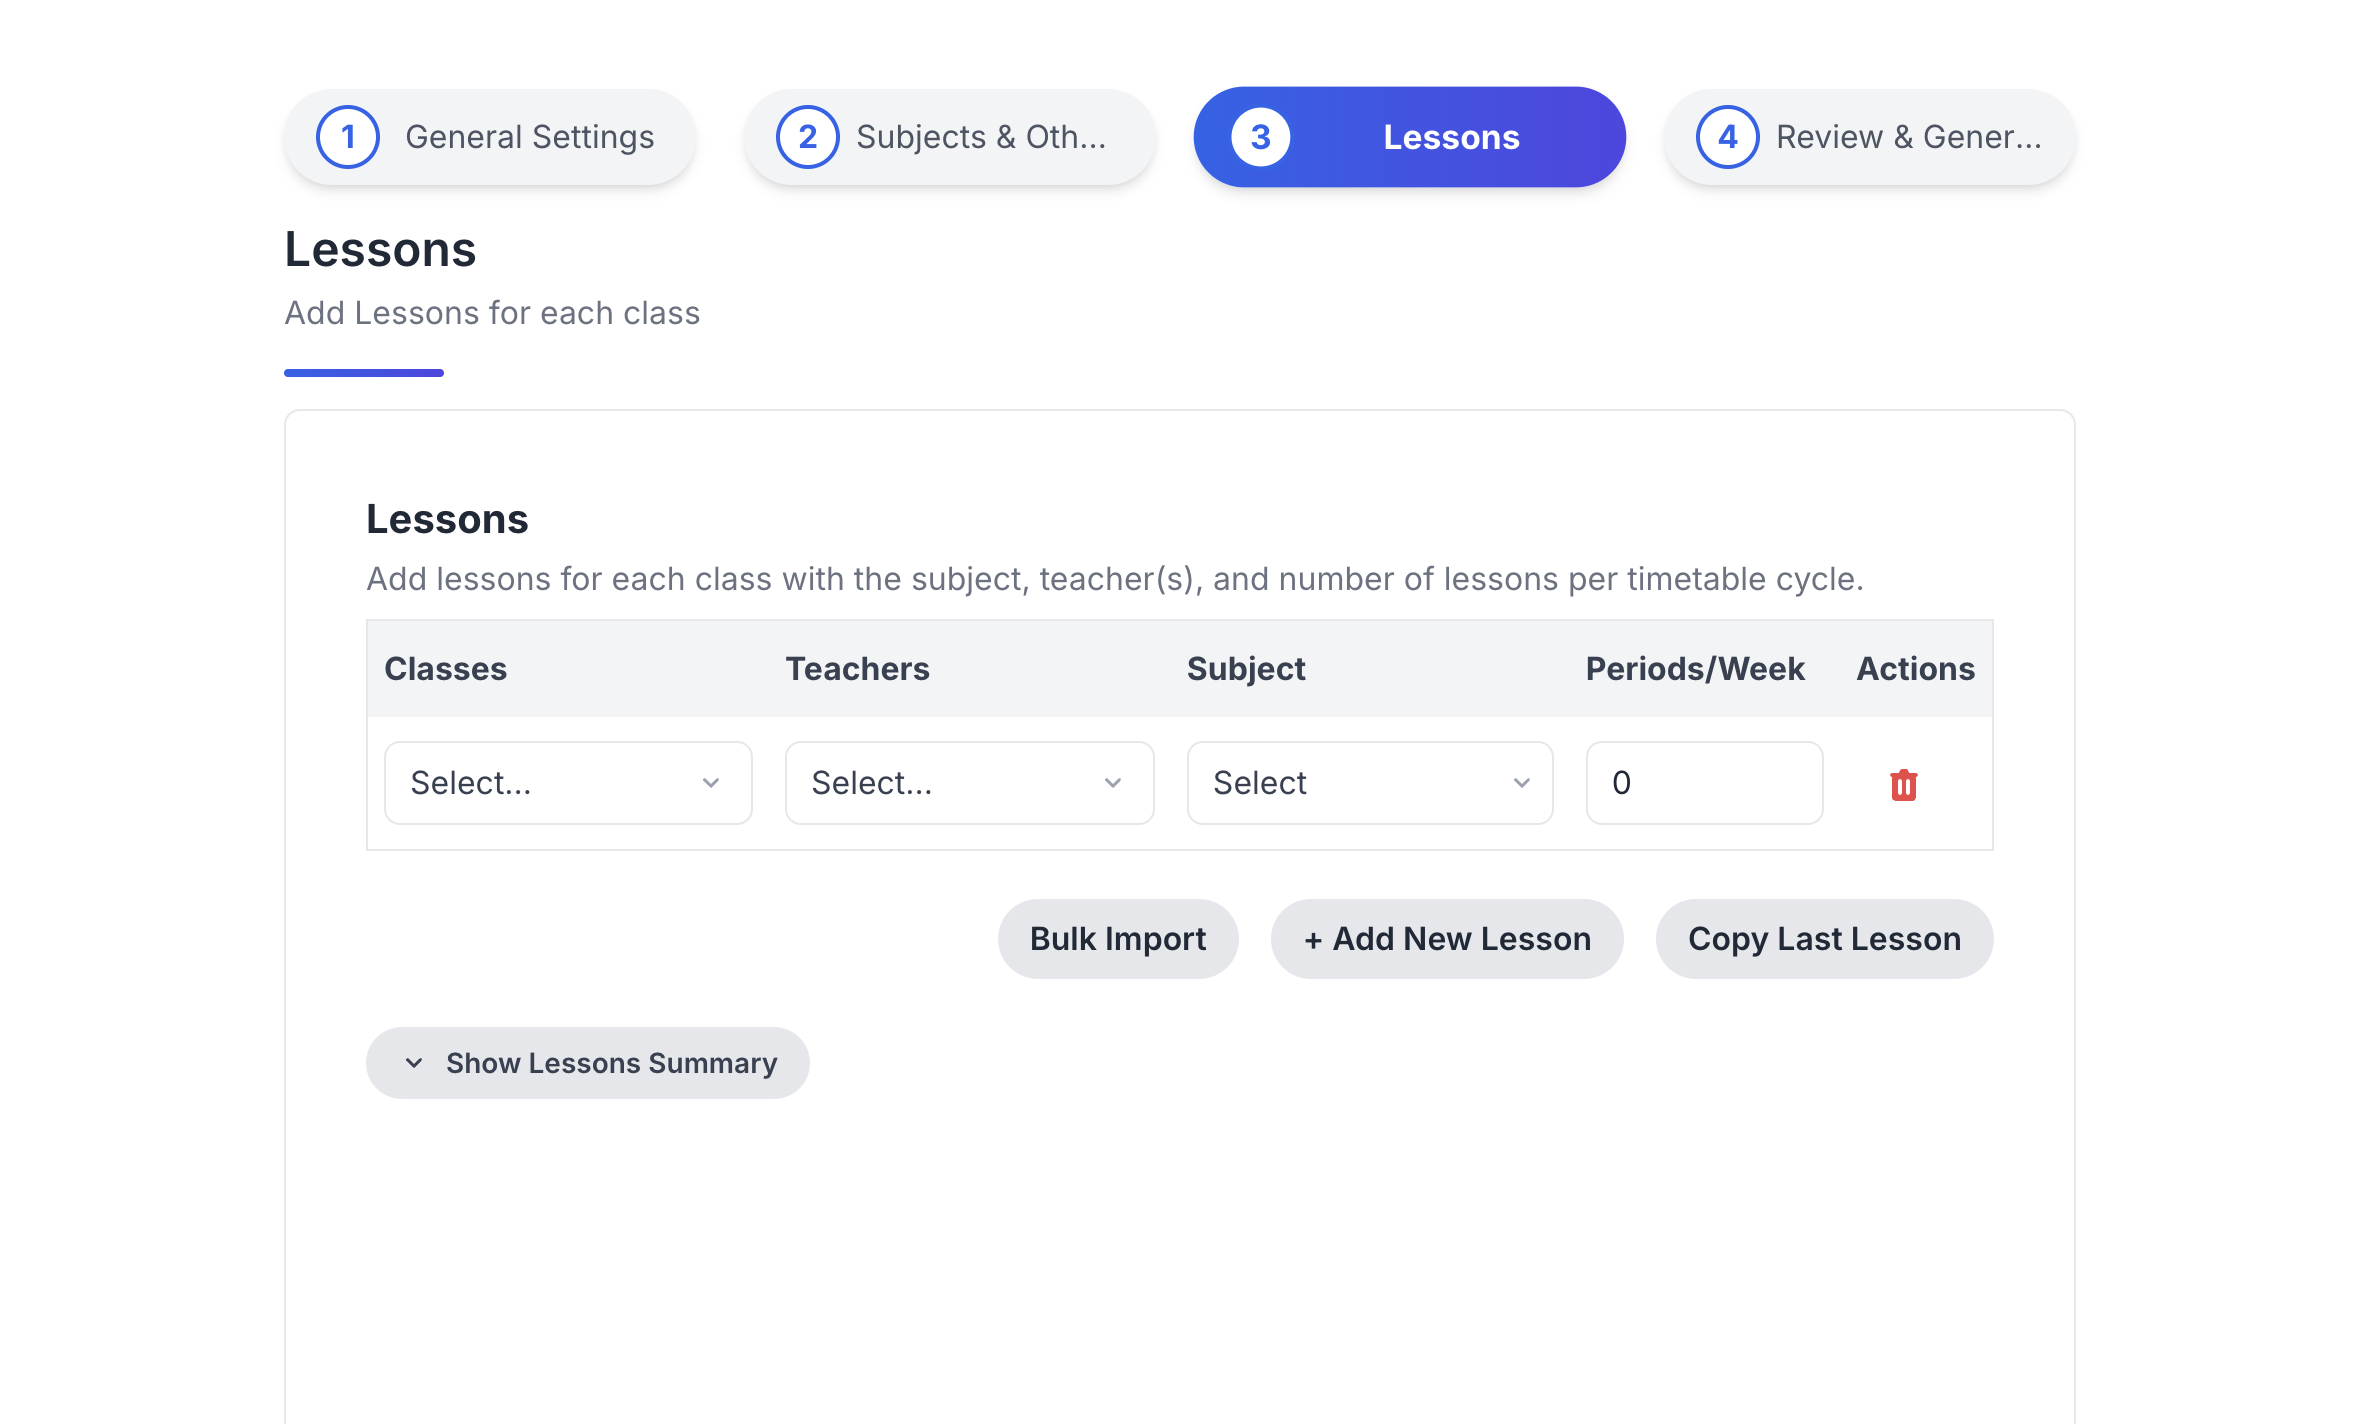
Lesson Entry Interface
Adding Lessons
Key Lesson Parameters
When creating lessons, you'll need to specify:
- Teacher: Who will teach the lesson
- Class: Which student group will attend
- Subject: What subject will be taught
- Periods: How many periods per week/cycle
- Special Requirements: Any specific constraints for this lesson
Individual vs. Bulk Addition
You can add lessons one by one or use the bulk import feature:
Individual Addition
For smaller schools or specific adjustments:
- Click "Add Lesson"
- Select the teacher, class, and subject from dropdown menus
- Specify the number of periods per week
- Add any special requirements
- Save the lesson
Bulk Import
For efficient setup of multiple lessons:

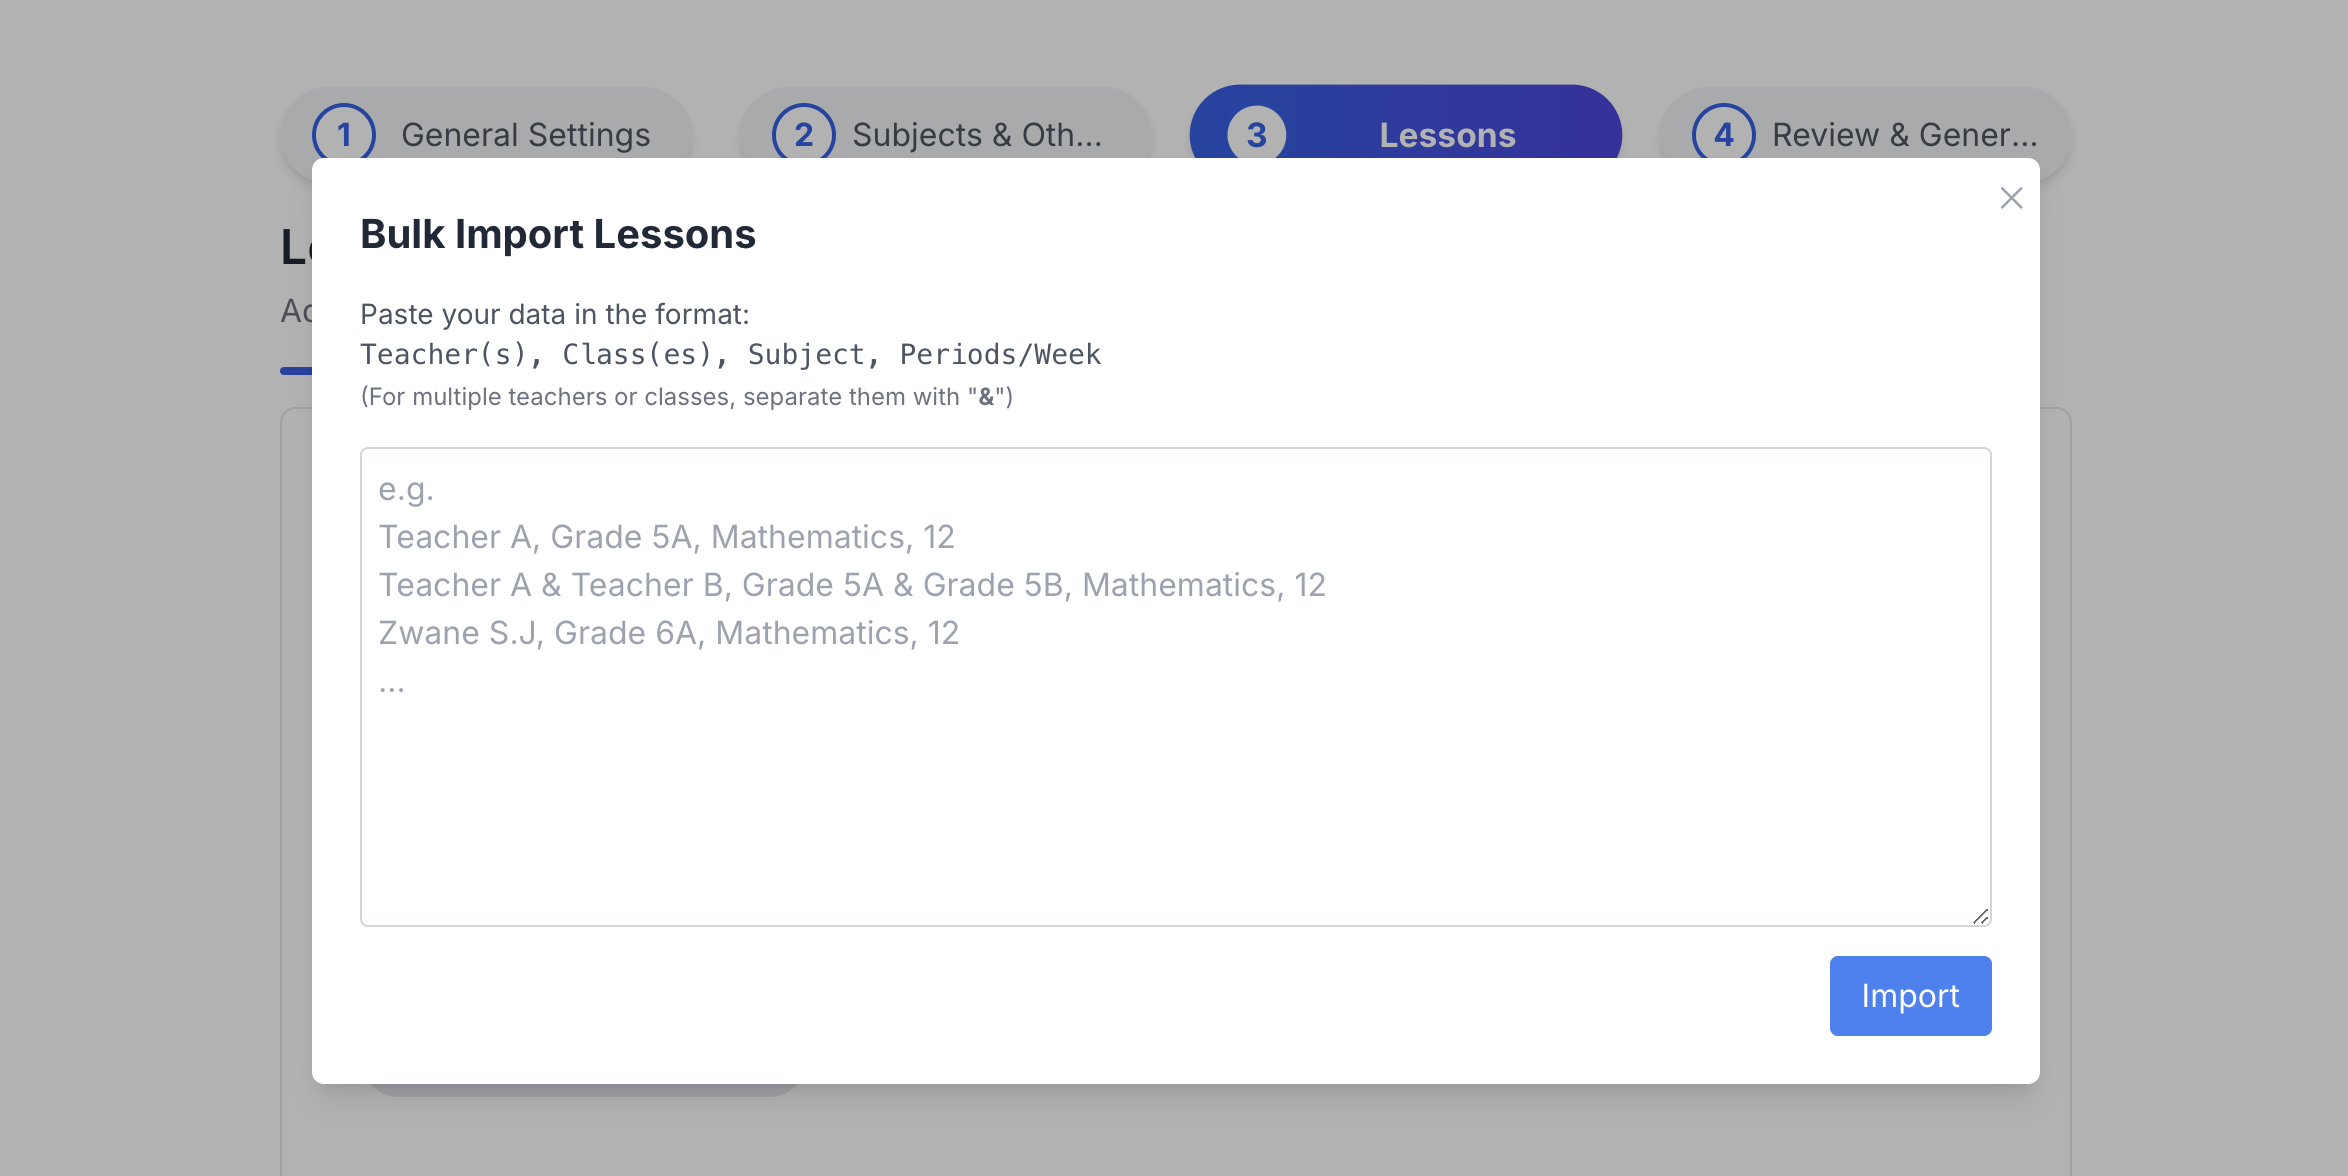
Bulk Import Tool
- Click the "Bulk Import" button
- Paste data from Excel or CSV file
- Map the columns to the appropriate fields
- Review and confirm the import
Sample CSV Format
Teacher Name,Class Name,Subject,Periods Per Week,Room Requirement
Sarah Johnson,Grade 8A,Mathematics,5,Regular Classroom
Michael Chen,Grade 10 Science,Physics,4,Science Lab
Priya Patel,Grade 7B,English,6,Regular Classroom
Robert Williams,Grade 11 Arts,Fine Arts,3,Art Studio
Fatima Al-Zahra,Grade 9A,History,4,Regular Classroom
Prepare your lesson data in a spreadsheet with all the necessary information before starting. This preparation will significantly speed up the import process.
Lesson Configurations
TimetableMaster supports various specialized lesson arrangements:
Consecutive Periods (Double/Triple Periods)
For subjects that need extended time slots:
- Create the lesson as normal
- Enable the "Allow Consecutive Periods" option
- Specify how many periods should be consecutive (2 for double, 3 for triple)
- Set how many sets of consecutive periods are needed per week
For example:
- Physics: 4 periods per week, configured as 2 double periods
- Art: 3 periods per week, configured as 1 triple period
Split Classes
When a class is divided for certain subjects:
- Create groups as needed for a lesson entry
- Specify teachers and subjects for each group
- All the lessons will be scheduled at the same time for all teachers
Examples:
- Half of Grade 9A takes French while the other half takes Spanish
- Grade 8 students separated by gender for Physical Education
Combined Classes
When multiple classes are taught together:
- Create a lesson with selecting multiple classes
- Select all classes that will be taught together
- Assign one teacher (or multiple for team teaching)
Examples:
- Small Grade 12 Physics and Chemistry classes combined for efficiency
- Grade 10A and 10B joining for special project sessions
Completed Lesson Setup
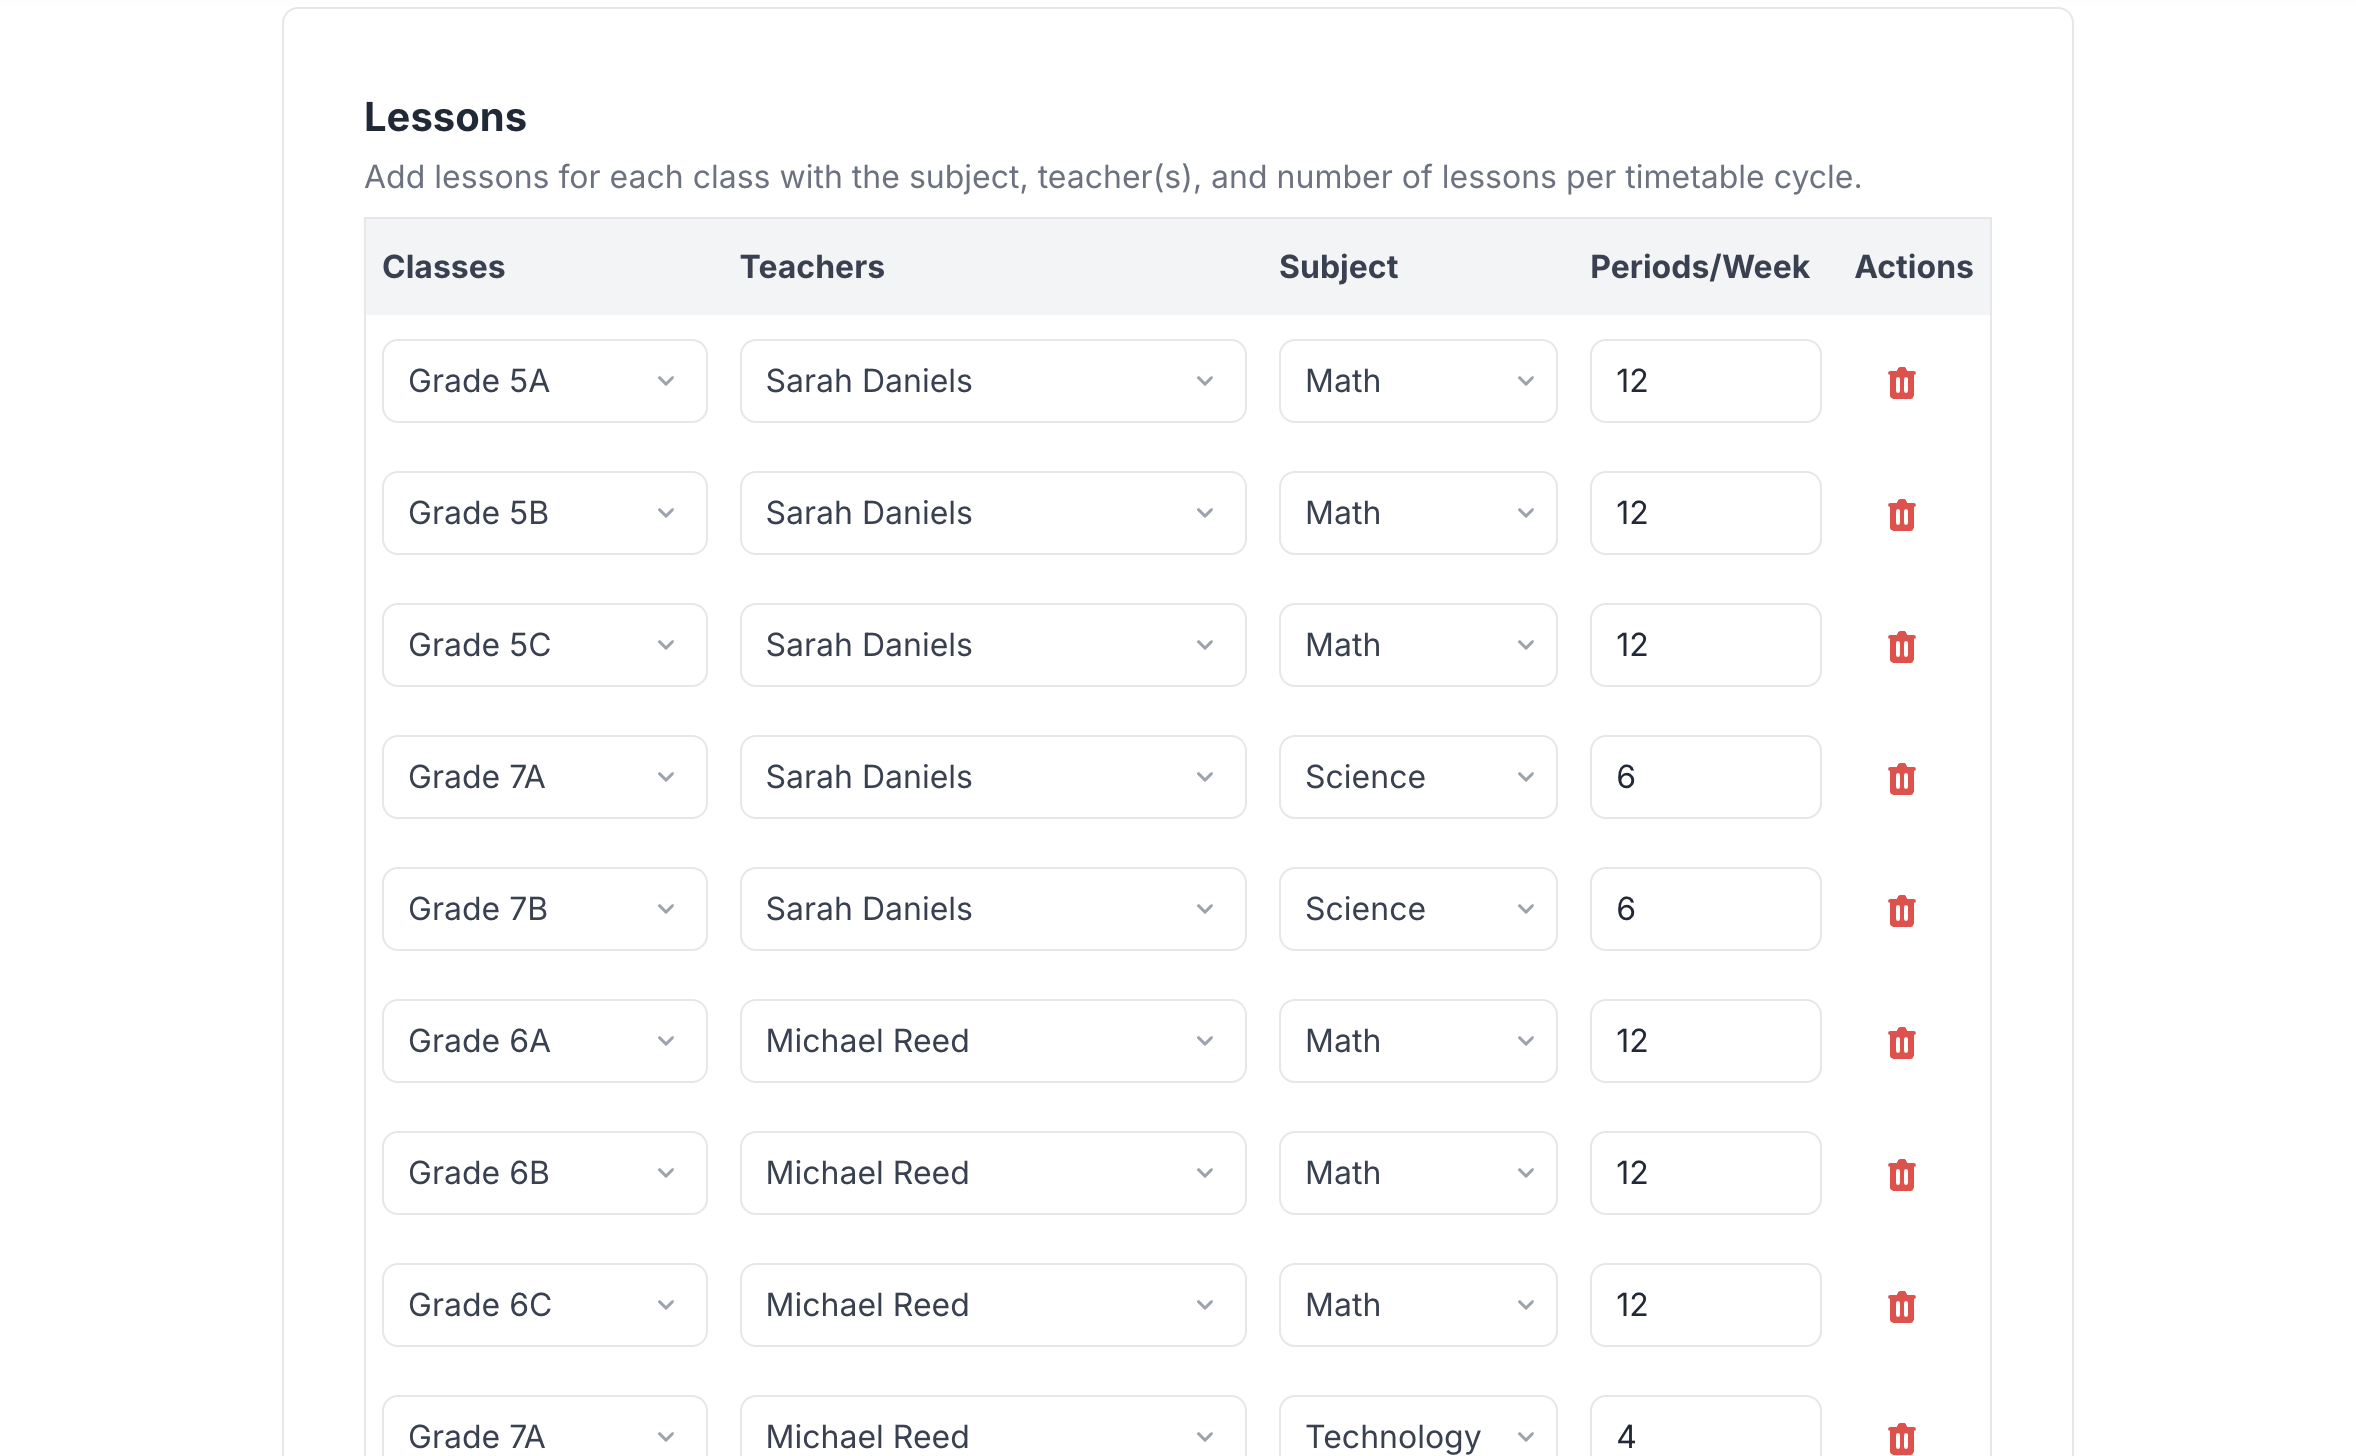
After adding all lessons, your lesson list will look similar to this:

Lessons Added
Lesson Verification
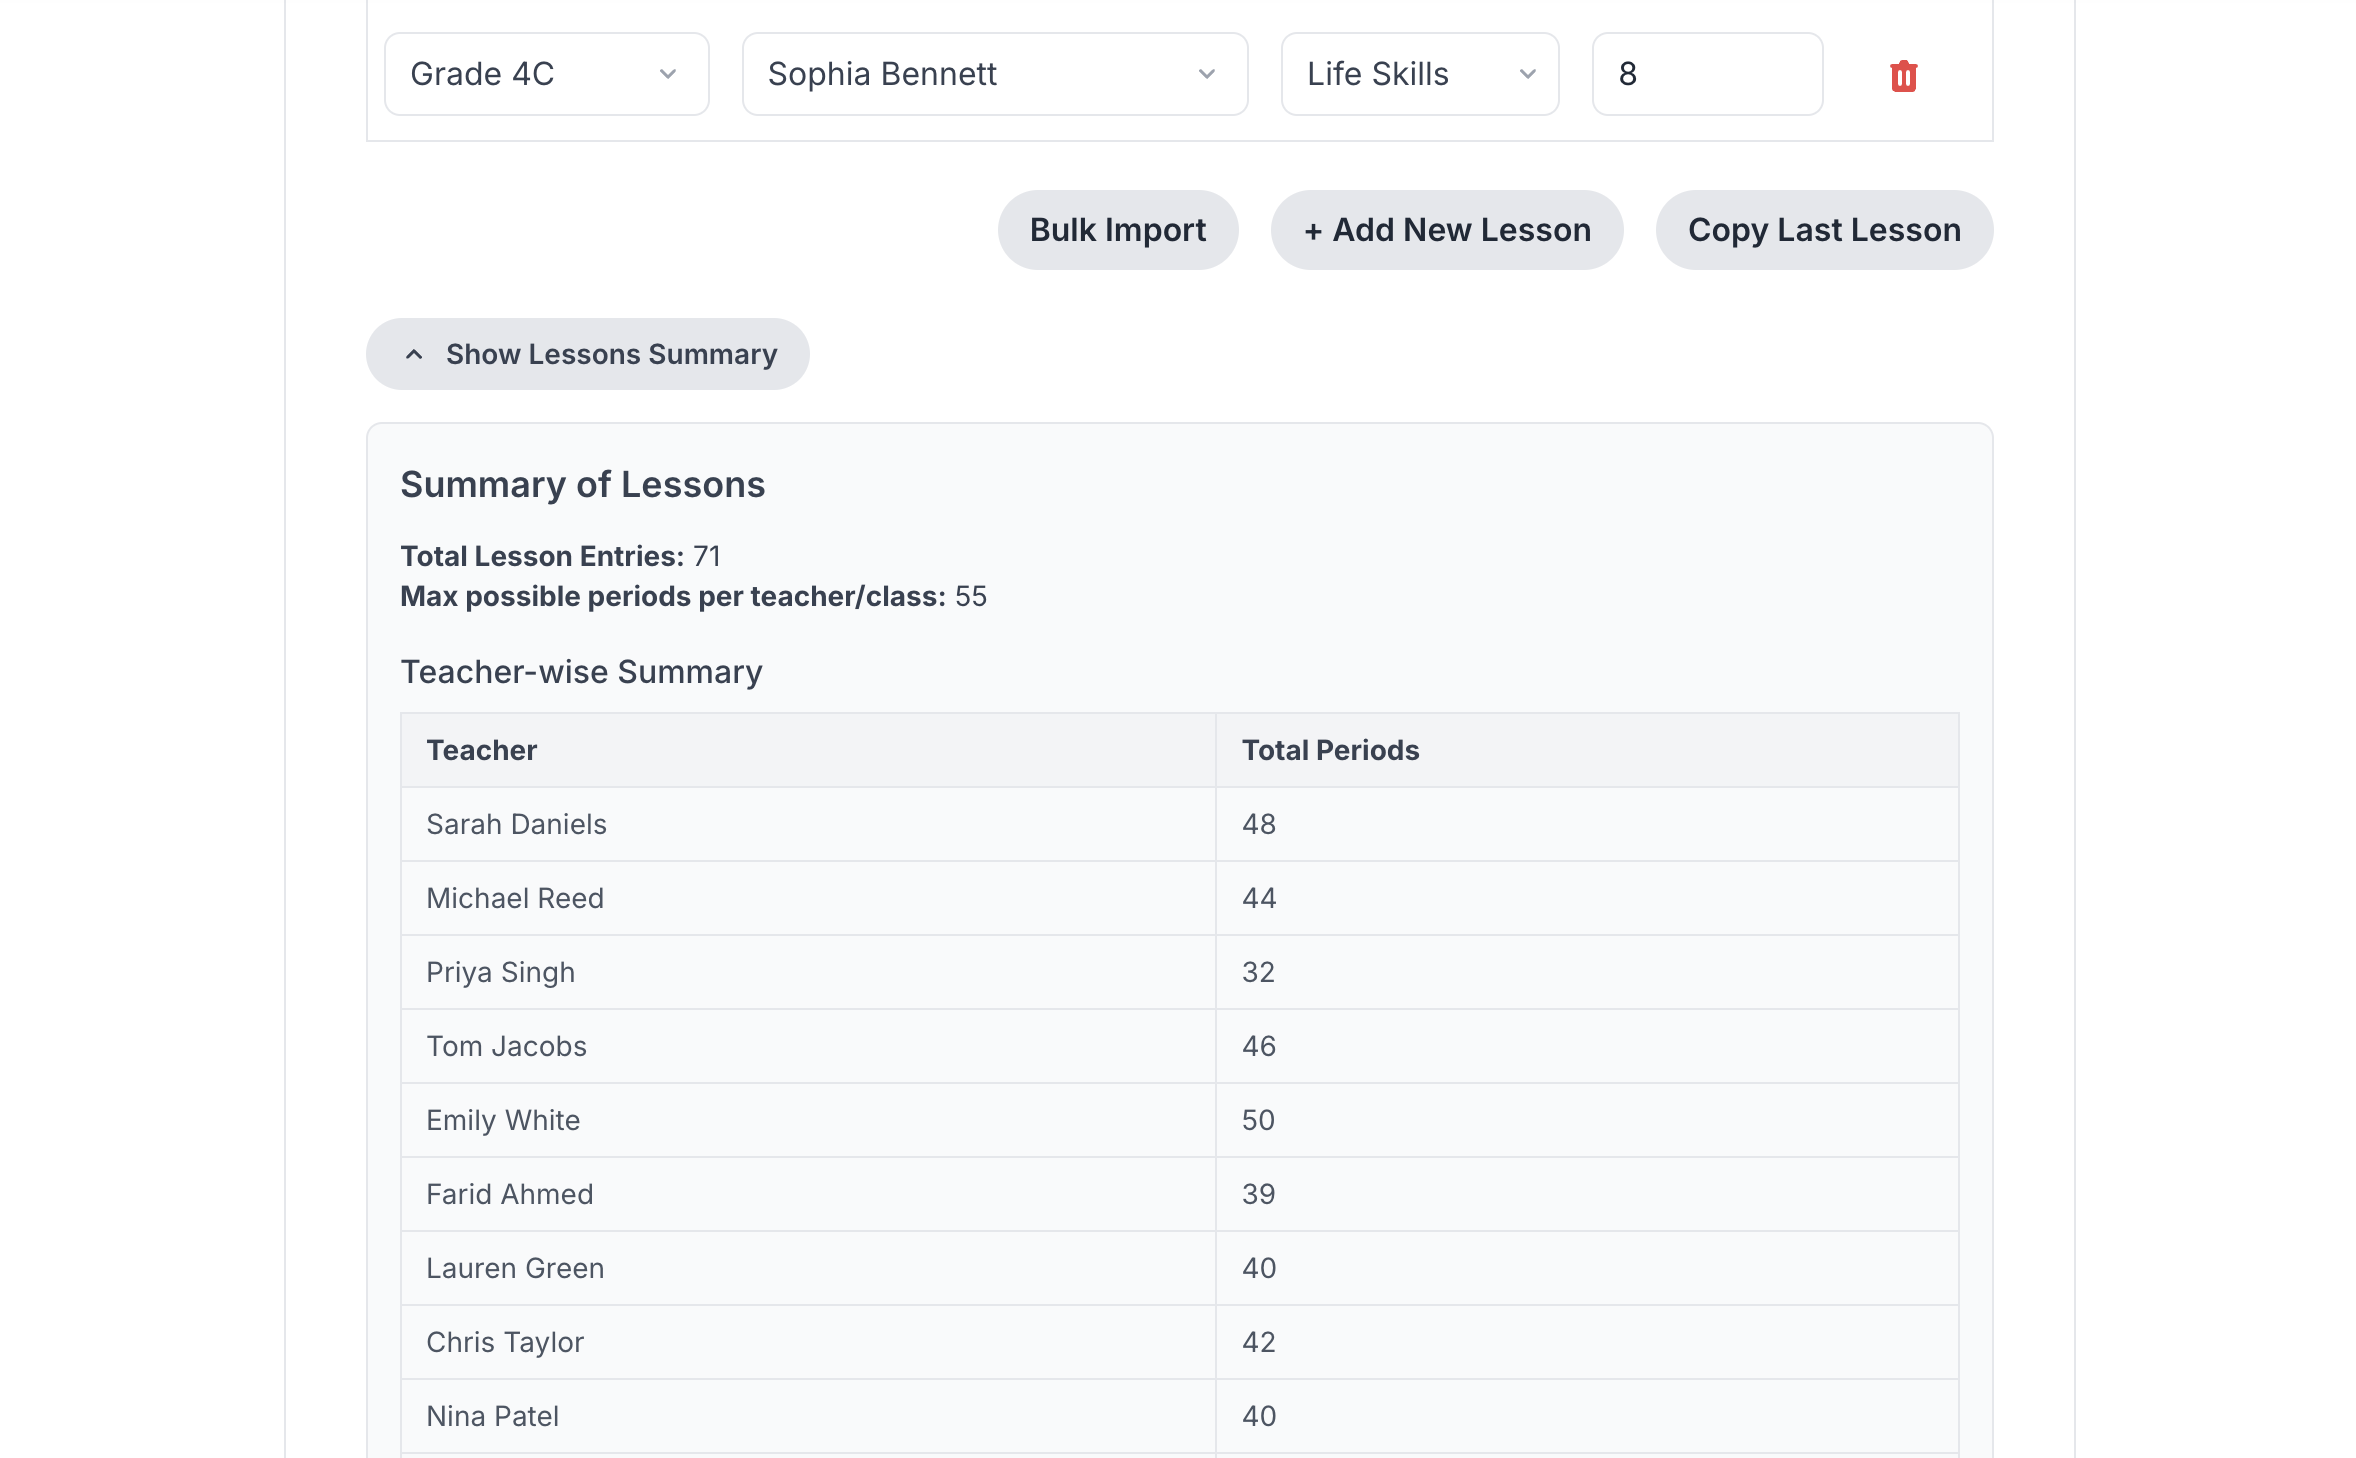
TimetableMaster provides verification tools to ensure all necessary lessons have been created:

Summary View
Tips & Best Practices
Balance Teacher Loads
- Distribute lessons evenly among qualified teachers
- Consider lesson complexity when allocating (lab sessions may be more demanding)
- Ensure part-time teachers have appropriate allocations
Optimize Student Experience
- Avoid scheduling challenging subjects back-to-back
- Consider the cognitive load across the day and week
- Ensure a balanced variety of subjects each day
Plan for Flexibility
- Allow some room for adjustments after generating the timetable
- Consider future changes when setting up lessons
- Document special arrangements for reference
Review Thoroughly
Before proceeding to timetable generation:
- Check for missing lessons
- Verify all teaching allocations
- Ensure room requirements are accurate
- Confirm all special arrangements are properly configured
Next Steps
With your lessons properly configured, you've completed all the preparatory steps for timetable generation. Next, you'll review your data and generate the timetable.
Before Moving On, Ensure You Have:
- ✓ Created lessons for all teacher-subject-class combinations
- ✓ Set appropriate periods per week for each lesson
- ✓ Verified the completeness of your lesson allocations
Ready to proceed? Continue to the next step to review your data and generate your school timetable.